- Print
- DarkLight
- PDF
Overview
The Summarization feature in Ushur Hub introduces the capability of a feedback loop for document uploads, providing real-time validation and error reporting. This capability enables end-users to receive immediate feedback regarding the correctness of data in census or contribution documents. Ushur's intelligent Document Automation (IDA) system processes the files and generates a summary of the data validation results, highlighting records that require corrections to be made by the end-user. This empowers end-users to address issues promptly and re-submit the corrected files, ensuring data accuracy and efficiency in the downstream systems.
The feature supports uploading CSV and Excel files and integrates seamlessly with Ushur workflows. It delivers actionable insights over the Ushur Hub interface to end-users. It enhances user confidence in their submissions while significantly reducing the time spent on back-and-forth corrections by the enterprise knowledge worker.
Feature Description
The Ushur Hub - Summarization feature addresses common challenges in document submission workflows by providing:
Automated Validation and Feedback:
Processes uploaded documents to validate data accuracy and completeness.
Displays a success message if all records are valid, including the number of records processed.
Highlights issues if any records fail validation, specifying the errors detected.
Actionable Error Reporting:
Generates a downloadable processed file with highlighted errors for easy reference.
Provides a summary of detected issues, such as missing or incorrect fields (e.g., date of birth, postal codes, names, or contribution amounts).
Streamlined Resubmission Workflow:
Allows users to re-upload corrected files directly from the interface.
Ensures updated rules and configurations are applied automatically without requiring engagement refreshes.
Operational Efficiency:
Reduces friction for end-users by minimizing delays caused by undetected errors.
Enables enterprises to collect clean data in a single submission cycle, avoiding repetitive interactions.
Pre-Requisites
Enterprise Setting: Summarization must be enabled at the enterprise level. Contact your Customer Success Team to activate this feature.
Workflow Setup: Requires creating workflows in the Ushur Platform (builder 1.0) with the Document Processor and Open Response modules.
Step 1: Create a Workflow in the Ushur Builder 1.0
Follow these steps to create a workflow for enabling the Summarization feature in the Ushur Platform.
The workflow must be created in the Legacy Builder as the Document Processor and Open Response modules are only available there. Once created, it can be used in both the Legacy Builder and Ushur Hub.
Add the Document Processor Module:
In your workflow, add the Document Processor module.
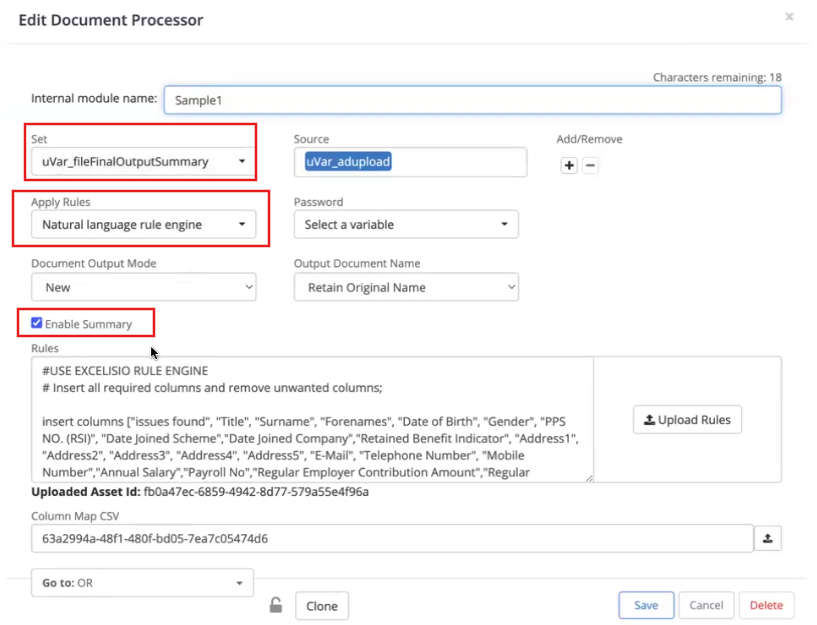
In the Set Variable field, assign a variable of type Summary.
To create the Summary variable:
Navigate to the Variables tab.

Enter the following details:
Name: Provide a name for the variable.
Description: Add a brief description.
From the Select Variable Type dropdown, choose Summary (to store and provide a summary of file validation).
Click Add Variable.
From the Apply Rules dropdown menu, select Natural Language Rule Engine.
In the Rules field, specify the Domain Specific Language (DSL) rules and conditions to process the document for the document transformation feature.
Note
Contact the Customer Success team to get the Document Transformation Rule. For more information, Documentation Transformation.
Enable the Summary option (this appears only when the Natural Language Rule Engine is selected).
Review the predefined rules displayed in the Rules field.
If necessary, modify the rules directly in the field to match your document processing requirements.
Save the changes to apply them.
Note
Updated rules will apply dynamically to all subsequent document uploads without requiring any workflow reconfiguration.
For more information, refer to Document Processor Module.
Add the Open Response Module:
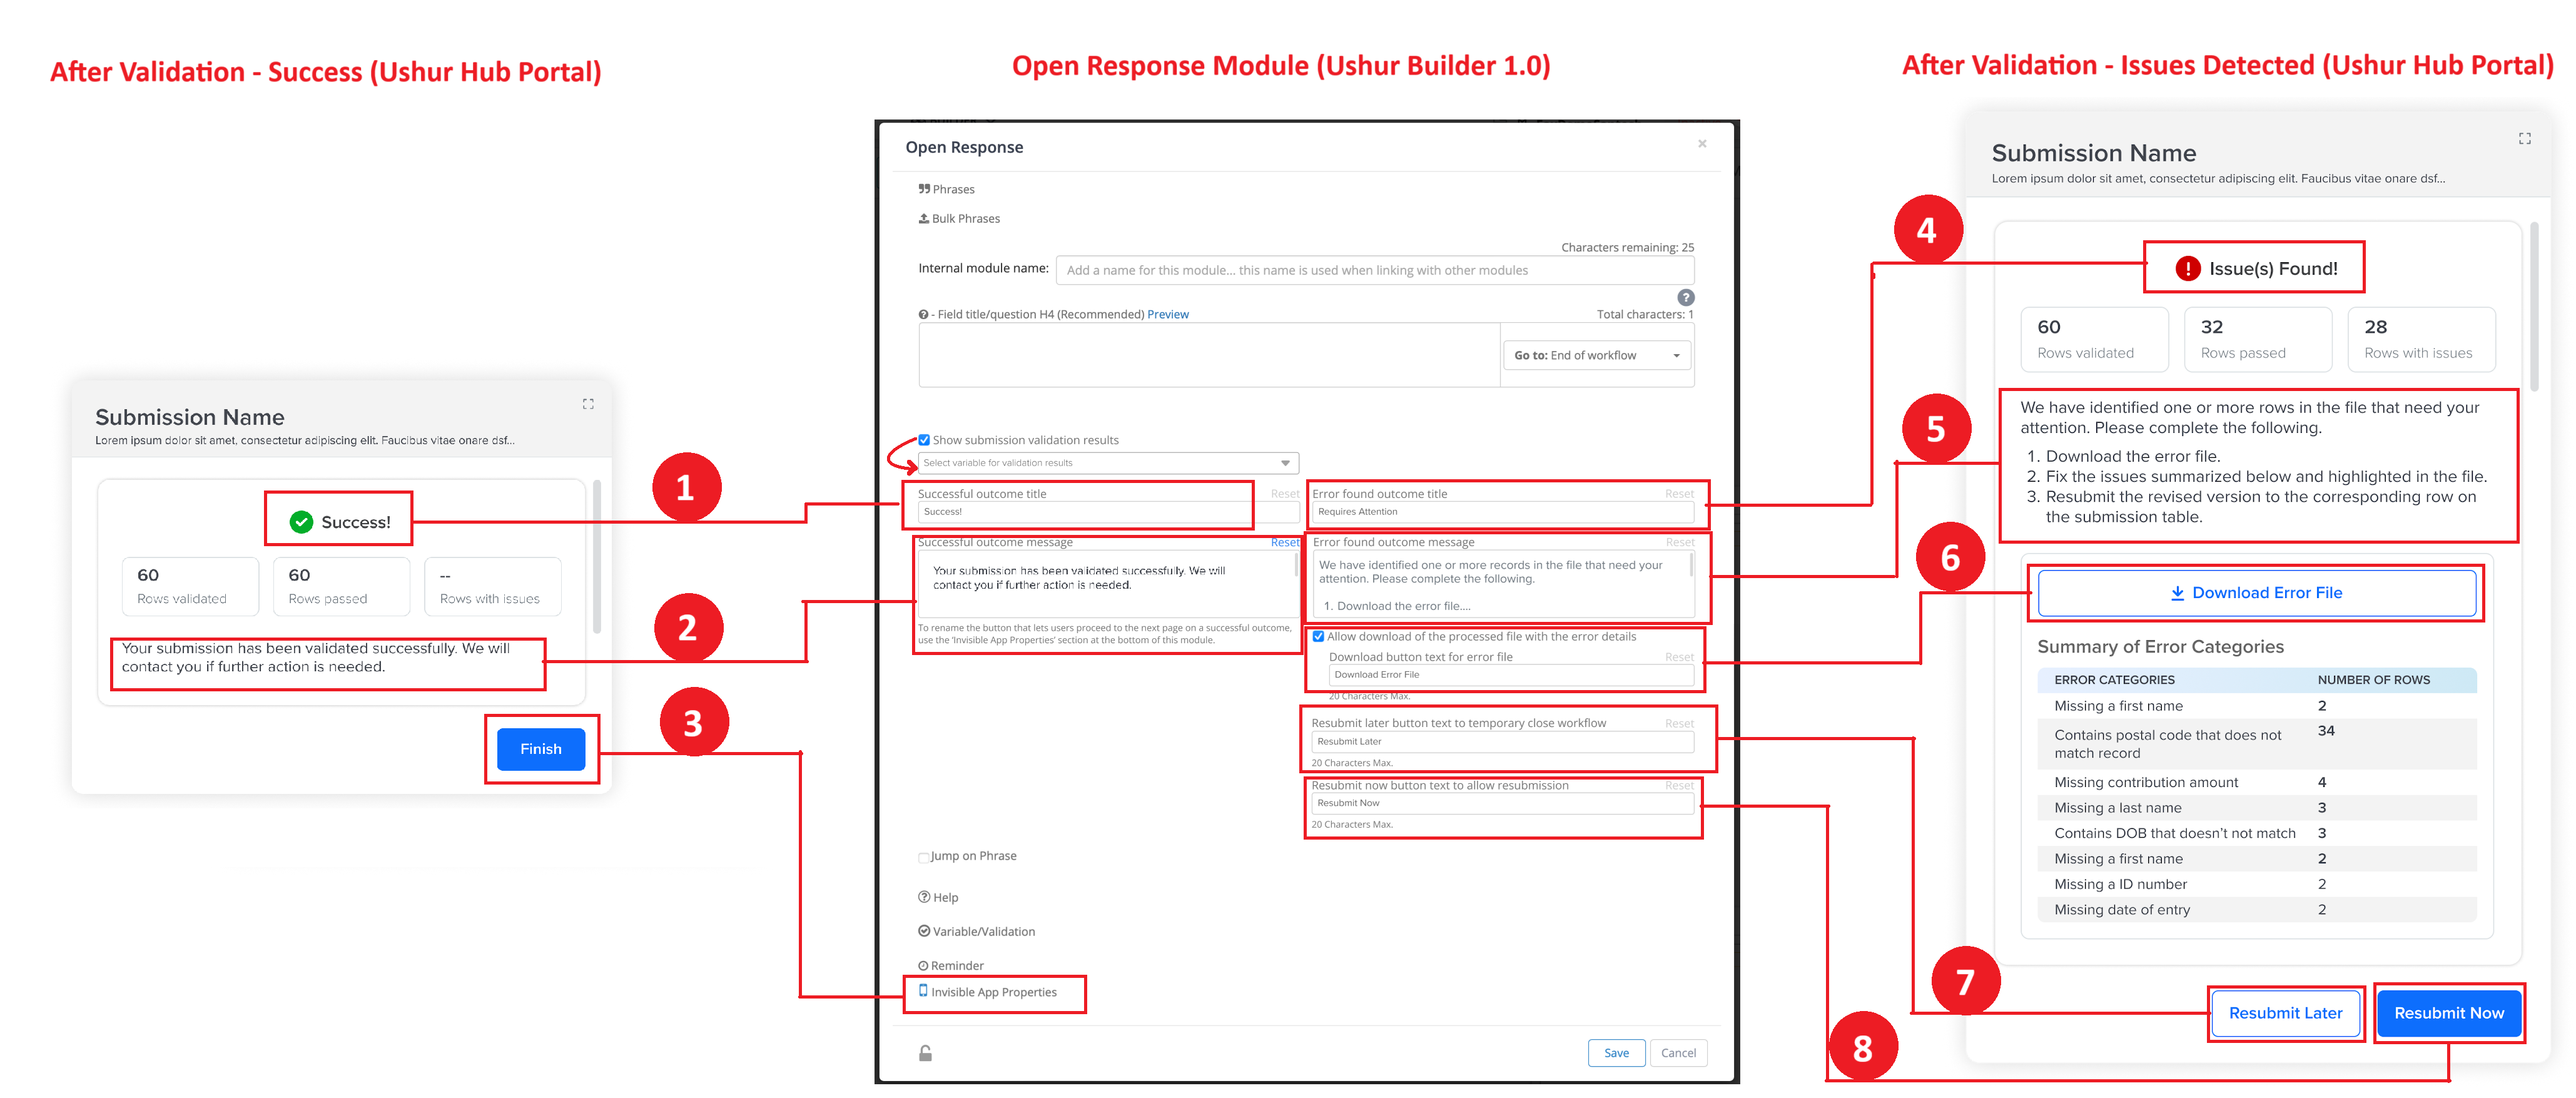
Include the Open Response module in the workflow.
Enable the Show Submission Validation Results option.
Assign the Summary variable created earlier from the dropdown.
Configure the outcomes:
Successful Outcome
Error Found Outcome
Successful Outcome Title: Provide a success title (e.g., “Success!!”).
Error Found Outcome Title: Provide an issue title (e.g., “Issue(s) Found!”).
Successful Outcome Message: Add a success message for validation (e.g., “Your submission has been validated successfully…”).
Error Found Outcome Message: Add a message summarizing the issues and instructions for re-submission (e.g., “We have identified one or more records in the file…”).
Configure the next page button:
To rename the button for moving to the next page after a successful outcome, use the ‘Invisible App Properties’ section at the bottom of the module.
Character Limit: 20
Configure Download Processed File:
Select the checkbox to Allow download of the processed file with the issue details option.
Use the Download Button Text for Error File field to configure the download button text.
Character Limit: 20
Configure the Resubmit Later button:
This button allows users to temporarily close the workflow.
Enter the desired text to customize the label for the Resubmit Later button.
Character Limit: 20
Configure the Resubmit Now button:
This button enables users to resubmit the file immediately.
Enter the desired text to customize the label for the Resubmit Now button.
Character Limit: 20
Save and publish the Workflow:
Ensure all configurations are complete.
Save and publish the workflow for further use.
Step 2: Assign the Workflow to the Use-Case
Navigate to the Ushur Hub:
Log in to the Ushur Platform.
Go to the Dashboard and click on Hub Settings.
Select the Use-Cases Tab:
Navigate to the Use-Cases tab.
Choose the applicable use case to configure.
Configure Workflow 1 (Form Submission):
Go to the Form Submission section (left panel on the Ushur Hub Portal).
In the Form Ushur drop-down, select the workflow created using the Document Processor and Open Response modules.
Configure Workflow 2 (Datatable):
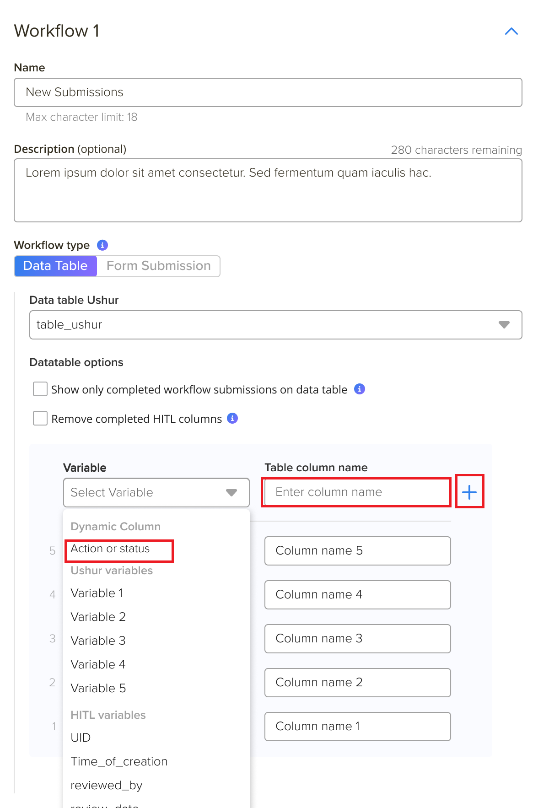
Go to the Datatable section (right panel on the Ushur Hub Portal).
In the Data Table Ushur drop-down, select the same workflow created earlier.
From the Variable dropdown, select the Action/Status variable.
Enter the Table Column Name (e.g., Action).
Click the Add + icon.
Click the More icon next to the newly added Action/Status variable to configure its properties.

Select Add Action/Status.
In the Add Action/Status to Action dialog box, set the Column Function to "Open Workflow – Continue Current Form Submission."
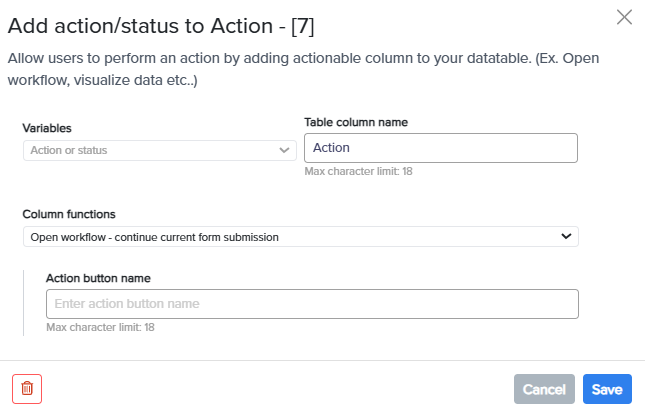
Specify the Action Button Name (e.g., Resubmit).
Click Save.
Once all the changes are done, click the Save Changes button.

Publish the Use-Case:
Click on the Publish button to make the use case live on the Ushur Hub Portal.
For more information on configuring the use case, refer to Use-Cases Tab Settings.
Step 3: Accessing the Summarization Feature in the Ushur Hub Portal
Log In to the Ushur Hub Portal
Access the Ushur Hub Portal using your login credentials.
Select the Assigned Use Case
From the dashboard, locate the use case that was configured.
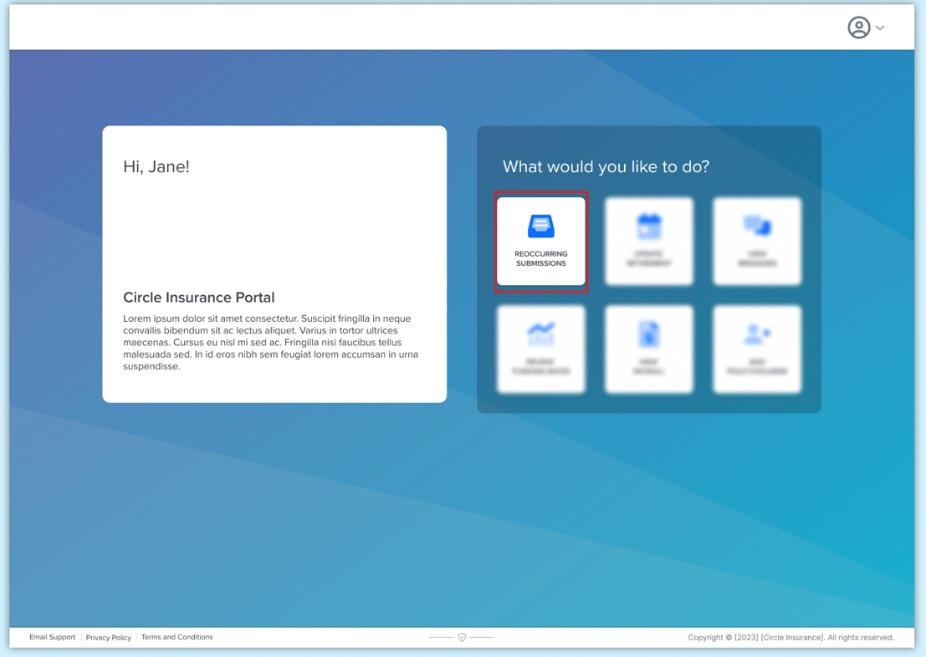
Click on the use case to open it.
Portal Interface Overview
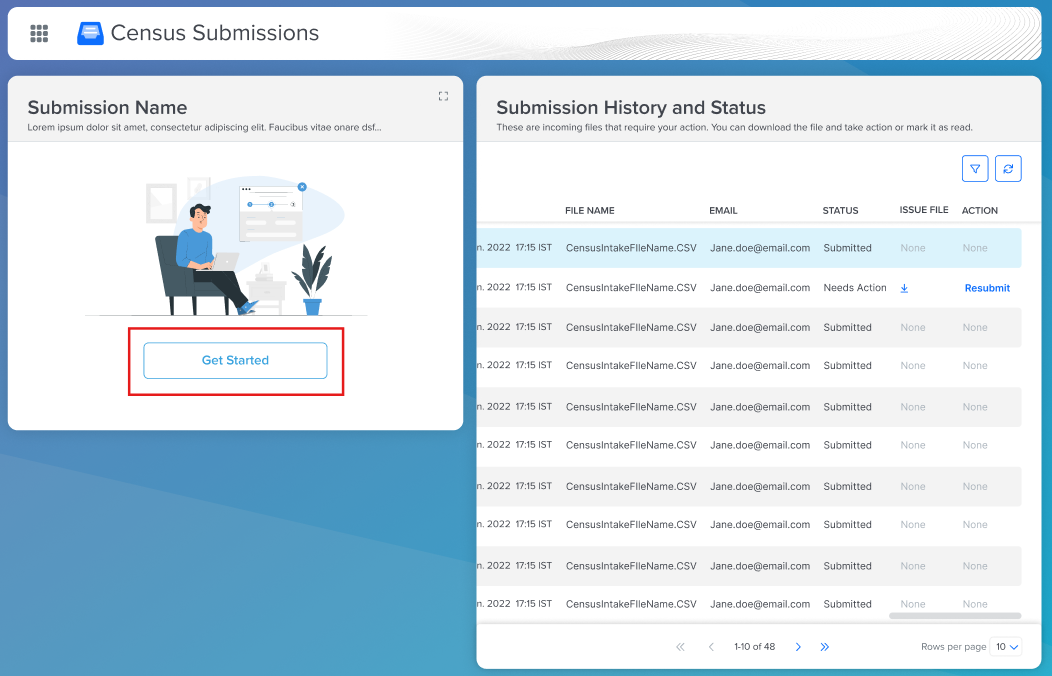
The interface will display two main sections:
Left Panel: The Form Submission workflow for uploading and processing files.
Right Panel: The Submission History and Status section displays submission records and associated actions.
Initiate File Upload
In the Form Submission panel (left panel):
Click the Get Started button to begin.
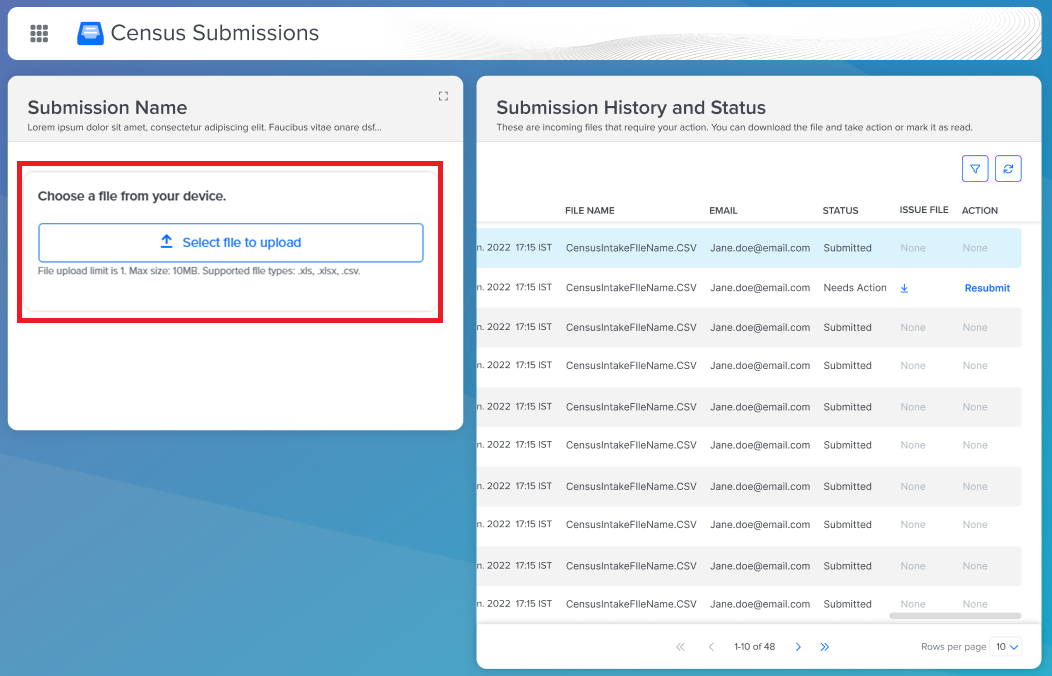
Select the file to upload (supported formats: .xls, .xlsx, and .csv).
If the file name contains unsupported special characters, it will be automatically renamed during upload, and a warning message will be displayed.
Password Protected Files:
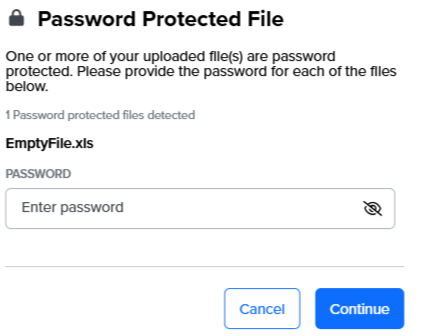
If the file
 is password protected, system will prompt the user to enter the password.
Enter the password and click Continue.
Ensure the file meets the following upload constraints:
File Upload Limit: Only one file can be uploaded at a time.
Maximum Size: 10 MB.
Submit the File
After selecting the file:
Click Upload to initiate the processing workflow.
The system will process the uploaded file according to the configured rules.
Validation Outcomes
After Validation – Success
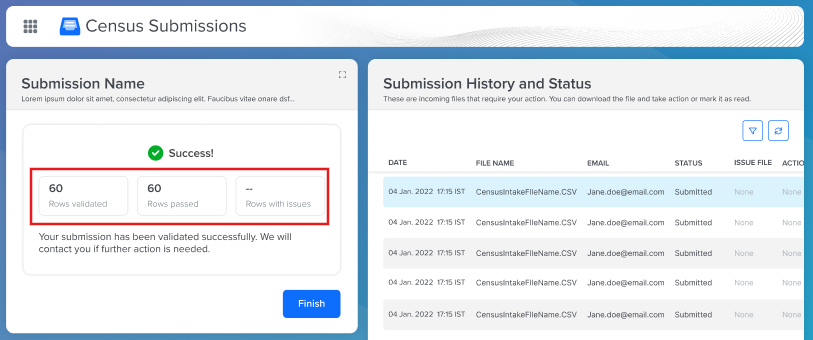
When all records in the uploaded file pass validation:
A success message is displayed in the Form Submission panel.
The success message includes:
Rows Validated: Total number of rows processed.
Rows Passed: Number of rows that passed all checks.
Rows with Issues: Displays 0 if no issues are found.
Summary of Error Categories: Confirms that no issues were detected.
Click the Finish button to complete the submission process. (The button text is configurable in the Open Response Module, refer to Add the Open Response Module.)
Note
No further action is required from the end-user once the submission process is completed.
After Validation - Issues Detected
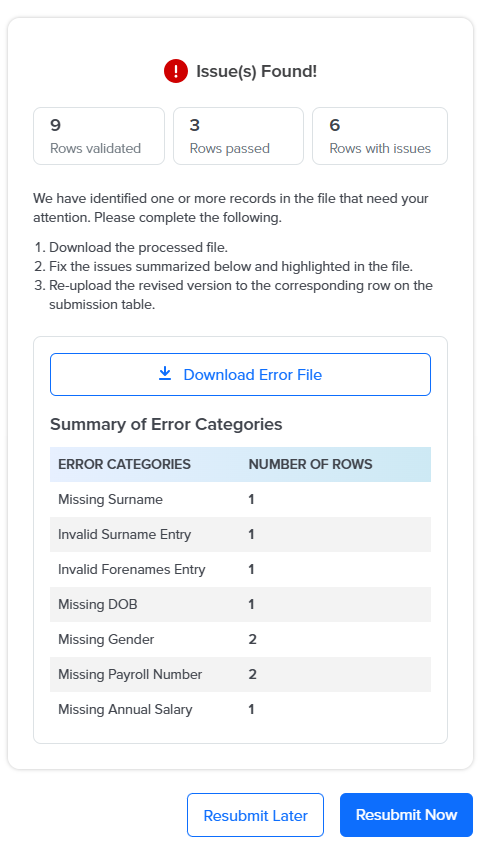
If validation detects issues in the file:
An error message is displayed in the Form Submission panel.
The error message includes:
Rows Validated: Total number of rows processed.
Rows Passed: Number of rows that passed checks.
Rows with Issues: Number of rows requiring corrections.
Summary of Error Categories: Lists the detected Error Categories, such as missing or invalid data (e.g., postal codes, last names, or contribution amounts) and the Number of Rows affected.
Click Download Error File button to download the file highlighting all detected issues. (Button text is configurable in the Open Response Module, refer to Add the Open Response Module).
Note
The error file generated from a password-protected file will not maintain the password protection. This is intentional and does not affect data security, as all file exchanges occur over the Hub's encrypted infrastructure.
The downloaded file includes:
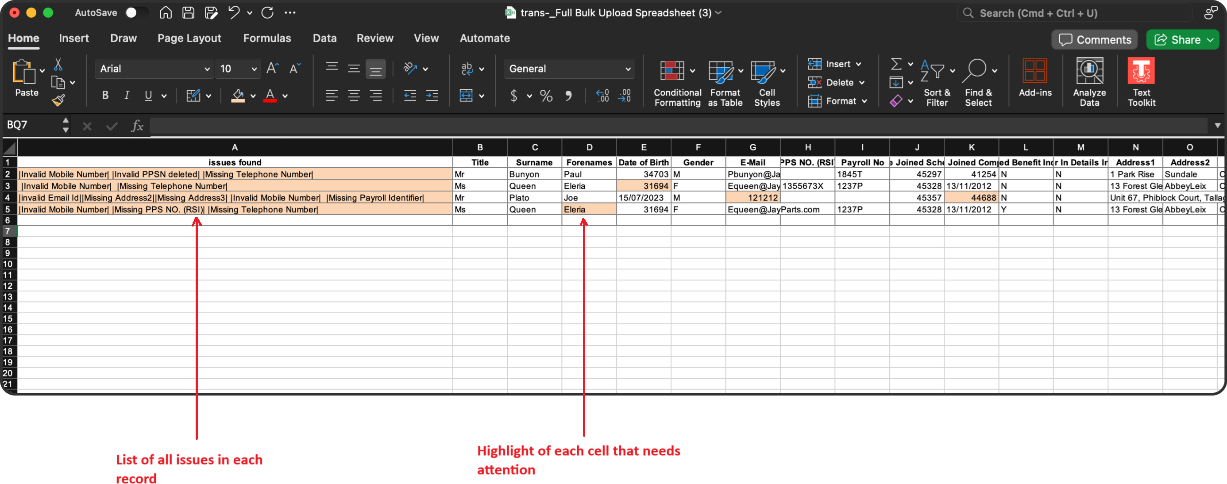
A list of all issues for each record.
Highlighted cells that require corrections.
Fix the Issues
Open the processed file and fix the highlighted issues using the provided details.
Save the corrected file.
Resubmit Later
Click the Resubmit Later button to end the engagement. The engagement data will be added to the Submission History and Status (right panel) with the Re-submit option.
Click the Refresh button on the Data Table to view the data (optional).
Resubmit Now: Click the Resubmit Now button to upload the corrected file to complete the engagement.
Reupload the corrected file on the Data Table.
If the user starts a new engagement via the Form Submission panel to re-upload a processed file, a new row will be added to the Data Table column.
To upload a corrected file for an existing engagement, go to the Submission History and Status panel and click the Resubmit button in the Action column of the corresponding row.
Note
Sorting on the Action column is currently not available.
Navigate to the Data Table column (right panel).
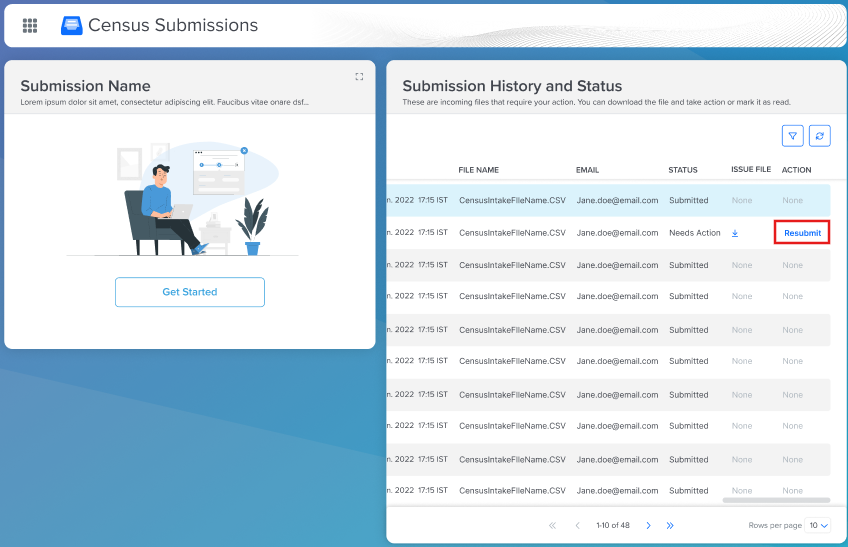
In this section, users can:
View Submission History: A list of all uploaded files with timestamps.
Check File Status: Displays Submitted, Needs Action, or Validated statuses.
Action: Displays action button (e.g., Resubmit) if issues were detected in a file.
To re-upload the corrected files, click the Resubmit button to open the resubmission workflow in a pop-up window.
Note
All the columns displayed in the Data table column are configurable via Dashboard > Hub-Settings > Use-Cases > Data Table Workflow.
Click Select File to Upload to re-upload the corrected file.
The system will reprocess the updated file.
If no issues are found in the re-uploaded file, all records will pass validation, and a success message will be displayed.
If issues are still detected, users can view the updated summary, make the necessary corrections, and repeat the upload process until the file is successfully validated.
Post-Validation Actions
Email Confirmation (configurable in the workflow):
Users will receive a confirmation email once the submission is validated successfully.
Admin Monitoring:
Admins can track the summarization status in the Initiated Activities section of the Ushur Hub Portal.
Limitations / Known Areas of Improvement
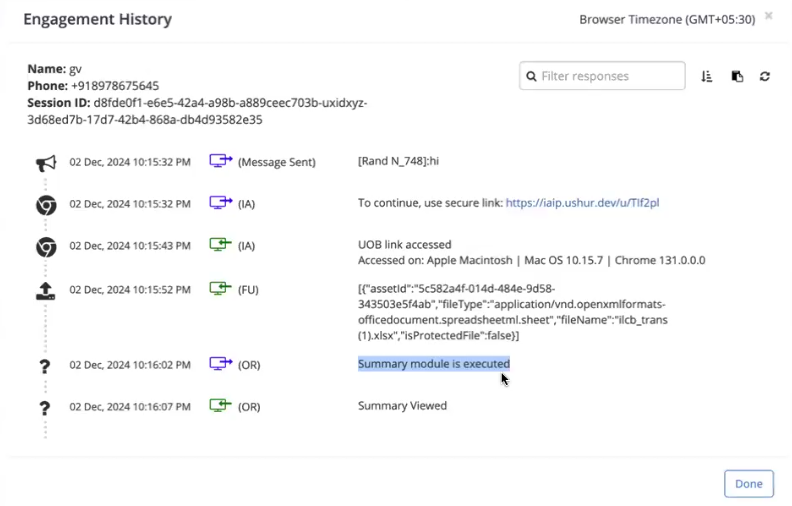
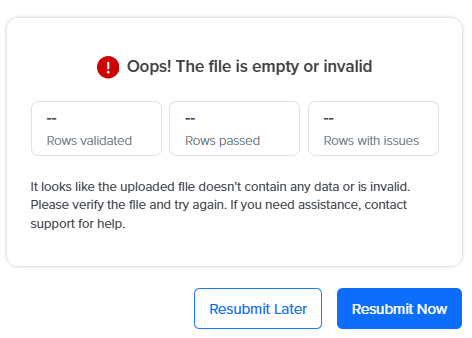
If the uploaded file is empty or a backend issue occurs, the system will display an error message as “undefined” (non-configurable).
Sorting on the Action column is currently not available on the Submission History and Status panel.
The Submission History and Status section displays only active and/or completed engagements/submissions and does not display expired submissions. Hence, we advise not to configure engagement expiry for ushur/workflows used in Ushur Hub use cases.


 is password protected, system will prompt the user to enter the password.


