- Print
- DarkLight
- PDF
The SFTP Connections section allows users to establish secure file transfer connections between the platform and external systems. These connections enable secure uploading and downloading of data, facilitating workflows, data exchange, and report generation.
Ushur Studio allows users to create SFTP connections for Ushur Server and Custom Server:
Ushur Server: Managed by Ushur, this is a hassle-free, cloud-based server solution for clients who prefer not to deal with server management, focusing instead on utilizing Ushur’s services.
Custom Server: Owned and operated by clients, this server setup allows for tailored control and management, with Ushur integrating through specific SFTP locations.
.png)
SFTP Connection Metrics
Total Connections: Displays the total number of established SFTP connections.
Ushur Connections: Displays the total number of connections created under Ushur Server.
Custom Connections: Displays the total number of connections created under a custom SFTP Server.
Configure SFTP Connections
Manage Ushur Server Connection
Prerequisite: Account Provisioning
The Ushur Server credentials are crucial for establishing a secure connection to the Ushur server, particularly for operations involving the SFTP (Secure File Transfer Protocol) server. End users can utilize these credentials to connect to the Ushur SFTP server from their SFTP client software. Follow the below steps to create Ushur server credentials:
Click the Ushur toggle tab and select the Create a Credential option in the connection table.
.png)
In the Create Credentials dialog box, enter the following details:
.png)
Username: Enter the username of the Ushur Server.
Confirm Username: Re-enter the same username of the Ushur Server.
New Password: Enter the password for the new user account. Password should have:
At least 8 characters in length.
Both uppercase and lowercase letters.
Both letters and numbers.
At least one special character (allowed are -,_and !).
Confirm Password: Enter the same password entered in the New Password field.
Click Create.
Go to the Ushur Server option, located near the toggle button.
.png)
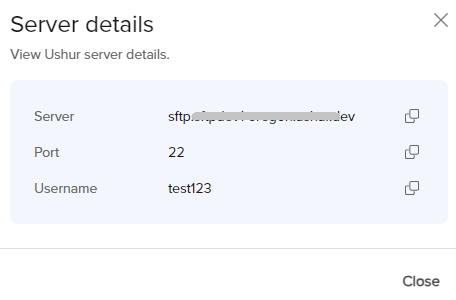
Choose View Server Details to see the server information. User can see and copy the following information:

Server
Port
Username
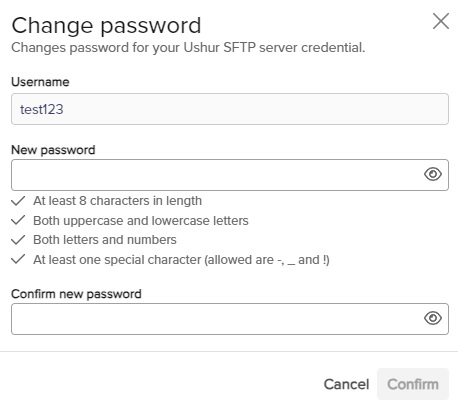
To update the server password, click Change Password. This is option is available only for Admin Role.

The username field is disabled to change.
Enter the New password in the New password field that meets the following criteria before proceeding:
Minimum 8 characters in length
Inclusion of uppercase and lowercase letters
Presence of both letters and numbers
At least one special character (e.g., ! @ # ? })
Re-enter the same password in the Confirm New Password field.
Click Confirm.
Add Connections
.png)
Click the Add Connection.
In the Add Connection dialog box, enter the following details:
.png)
Connection Name: Enter a unique identifier or text for the SFTP connection.
Description: Enter additional details about the connection.
Connection Type: From the drop-down menu, select the applicable options:
Project: Upload the data in .xls or .csv format on the path to launch multiple workflows.
Workflow: Upload the data to launch a single workflow.
Folder: Utilized for general file management, allowing both upload and download of various file types.
Project: Select the applicable project (Legacy or Ushur Studio) from the drop-down menu to associate the Ushur SFTP server.
Manage Custom Server Connection
Add Connections
Configure the Custom Server Connection by following the below steps:
Click the Custom toggle tab.
.png)
Select the Click Here option in the connection table or click the Add Connection option on the connection table.

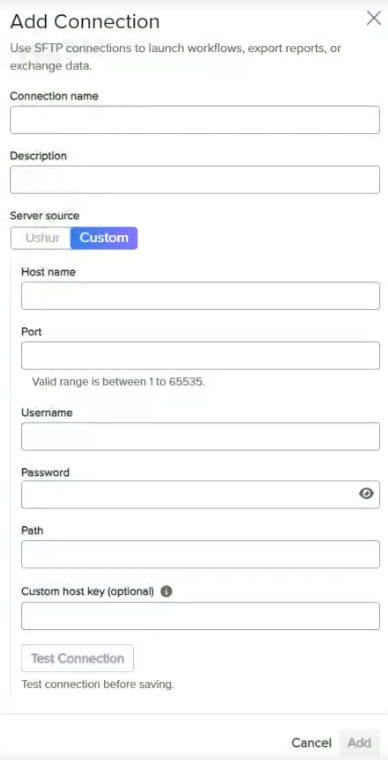
In the Add Connection dialog box, enter the following details:
Connection Name: Enter a unique identifier or text for the SFTP connection.
Description: Enter additional details about the connection.
Server Source: Select the custom server source to set up a user-defined SFTP server.
Host Name: Enter the address of the SFTP server. It must be a valid hostname or IP address.
Port: Enter the port number used to connect to the SFTP server. Typically set to 22 for SFTP connections; it must be within the range of 1 to 65535.
Username: Enter the username for SFTP server access.
Password: Enter the password associated with the username for SFTP access.
Path: Enter the directory path on the SFTP server where files will be uploaded or downloaded.
Custom Host Key (Optional): Enter the custom host key in the provided field to verify the server's identity.
Note
The Custom Host Key supports only server fingerprints. The key should begin as specified below:
RSA: “ssh-rsa {key}”
ECDSA: “ecdsa-sha2-nistp256 {key} or ecdsa-sha2-nistp384 {key} or ecdsa-sha2-nistp521 {key}”
The connection will still work even if the key is not provided.
Click Test Connection to verify the connection.
Click Add to save the connection.
SFTP Connection Table
The SFTP connection table displays the information based on the type of server selected:
The Ushur SFTP connection table displays the following information:
.png)
Connection Name
Connection Type
Path
Description
The Custom SFTP connection table displays the following information:
.png)
Connection Name
Description
Path
Host Name
Port
Username
Delete Connection
To delete a connection, follow the below steps:
Click the More
.png) icon at the end of the row.
icon at the end of the row..png)
Select Delete Connection.
Click Confirm to delete the connection.

.png)
.png)
.png)
.png)


.png)
.png)

.png)