Launch Workflow Module
- 28 Feb 2025
- 4 Minutes to read
- Contributors

- Print
- DarkLight
- PDF
Launch Workflow Module
- Updated on 28 Feb 2025
- 4 Minutes to read
- Contributors
- Print
- DarkLight
- PDF
Article summary
Did you find this summary helpful?
Thank you for your feedback
.png "image(123).png")
Overview
The Launch Workflow module is a new functionality added to the Ushur Studio Inspector Panel. This enables the user to initiate one workflow within another workflow instead of using the traditional JUMP method or calling via API and also it allows to start a new workflow as part of an existing campaign
This feature provides the user the flexibility to launch workflows via SMS or email, schedule the workflow, and pass the tags from the source workflow to the new workflow, while also offering the choice to seamlessly integrate the new workflow as part of an existing campaign or start it as a new campaign, ensuring a continuous and context-aware user journey.
Application
One of the common use cases of the launch module is to initiate another workflow within the existing workflow that already has a user interaction, and the user wants to initiate the new workflow without pausing the current workflow. In another use case user may want to initiate the new workflow pausing the current workflow. This feature gives users the flexibility to configure multiple workflows in a single engagement and also provides the ability to schedule the new workflow for a later time.
Configure the Launch Workflow Module
Navigate to the Modules list > UTILITY> Launch Workflow.
From the side inspector panel, drag and drop the Launch Workflow module inside the Step Logic space or double-click the module.
Click the Launch Workflow module panel to configure.
In the Workflow to Launch field, select the workflow from the dropdown menu or type the applicable workflow name.
Note
The workflows created in the Ushur Platform are marked with (legacy) at the end of the name, while Ushur Studio workflows have no suffix. For example:
Ushur Platform (legacy):
:module_icon: workflow_name (legacy)
Ushur Studio:
Configure launch as A New Campaign
Users can launch or schedule another workflow on any channel. This option will start the selected workflow as a new independent campaign. The current workflow will proceed without waiting for the new workflow. Users can assign initial values to the Tags in the new workflow to customize the user experience:
In the Recipient field, either enter the valid phone number prefixed with the ‘+’ country code or enter the valid email address based on the selected Channel.
Or, Insert the applicable tags by typing ‘{{‘ and select from the existing list of tags or click the (+) icon to create a new tag. For more information, see Tags.
.png "image(124).png")
In the Channel field, select the applicable channel mentioned below:
SMS
Email
Select the appropriate Launch schedule options mentioned below:
Immediately: Initiates the new workflow immediately.
.png "image(125).png")
At discrete time: Initiates the new workflow at a scheduled time and in a selected time zone.
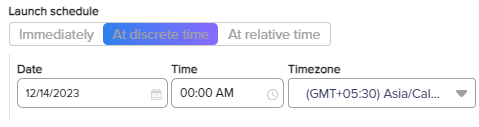
This option displays the following parameters:
Parameters
Description
Date and Time
Select the date using the calendar icon on which the new workflow should be executed. The default format is MM/DD/YYYY.
The default value is the current date.
Time
Select the time using the clock icon on which the new workflow should be executed. The default format is HH: MM AM or PM.
The default value is the 00:00 AM.
Timezone
Select the applicable time zone from the dropdown menu.
At relative time: This option initiates the new workflow after the scheduled number of days.
This option displays the following parameters:
Parameters
Description
Days from now
Enter the number of days after which the new workflow should be executed or insert the applicable tag.
The default format is DD.
Note: Only numerical values are accepted.
Time from now
Enter the number of hours and minutes after which the new workflow should be executed or insert the applicable tag.
The default format is HH:MM
Note: Only numerical values are accepted.
Select the appropriate tags that display under the Assign the initial value to Tags in the new workflow panel and enter the applicable value or select the applicable tag from the dropdown after typing ‘{{‘. This panel displays the following parameters:
Parameters
Description
SAVE TO TAG
The field displays the list of tags that are available in the selected new workflow.
DATA TYPE
The field displays the data type of the tag in the new workflow.
ASSIGN INITIAL VALUE (OPTIONAL)
Enter the applicable initial value or enter the character ‘{{’ and select the tag from the dropdown or type the tag name. See Working with Tags.
.png "image(124).png")
.png "image(125).png")

Configure launch as Part of this Campaign
Users can launch a step(Ushur Studio) or module (Ushur Legacy) from another workflow as part of the current campaign on any channel. The current workflow will be paused until the new workflow is complete. Users can assign initial values to tags in the new workflow to customize the experience.
.png "image(126).png")
In the Start at Step dropdown menu, select the starting Step (Ushur Studio) or Module (Ushur Legacy) of the selected workflow.
Note: Users can choose steps from workflows in Ushur Studio and modules from the Ushur Platform (legacy).
In the After workflow is complete, branch to dropdown menu, select the next step after the current workflow is completed.
Note: The current workflow and the launched workflow will share data across all Tags. Ensure that Tag names and types are consistent across both workflows to ensure proper data transfer.
Was this article helpful?