- Print
- DarkLight
- PDF
Roles and Users Tab Settings
Roles, User, and Organization Management help you onboard your internal admin users, as well as your customer organizations and their end-users with relevant roles and privileges into the Ushur Hub.
Roles management helps you create, edit roles, add permissions, edit or delete permissions, assign internal admins to track submissions, and external admins to track submissions to customize and assign specific roles for workflows to users accessing a particular use-case. This helps you assign specific use cases and workflows to specific users to enable them to engage better.
Add Roles
.png)
Follow the steps below:
From the Ushur Hub pane, select the Roles & Users tab.
Click Add to view the drop-down and select Roles.
Specify the Status. By default, the role you create will be enabled for all the users to access the use cases assigned to this role. If you disable the role, no users can access the use cases linked to this role.
Enter a valid name for the role.
Define whether the role is of type Internal or External.
Examples of internal users are your own Admin staff who need access to the Ushur Hub to view submissions across your customer organizations for a variety of use cases. This is optional and dependent on your business needs.
Examples of external users could be Admins, Managers, and Clerks who can have access to certain use cases depending on your business needs. For example: An external admin user from a customer organization can have access to all the use cases while a clerk could only have access to some use cases and only specific access to certain data columns on the Data Table. You can specify these granular access controls.
Specify a short description of the role.
Click Save Changes to view the Role Added Confirmation dialog box.
The role created will be displayed in a tabular column as shown below.
.png)
You can now add permissions to the role that you created.
Edit or Delete Roles
Follow the steps below to edit or delete roles:
Click on the role name from the Roles table, and click on the role name you would like to edit/delete.
Select the edit button next to the role name.
.png)
Modify the associated information to edit.
To delete a role, first ensure that there are no use cases associated with this role. Once all use cases are removed, click the trash icon to delete the role.
Add Permissions
To add permission, follow the steps below:
.png)
Click Permissions to view the following dialog box.
Select the Use Case to define the permissions you want to associate with the role. If there are no use cases added prior, you can create the specific use case from the Use Case tab and then select it to assign here.
Data tables are associated with the None / View permissions. This means that you can enable the fields either for viewing or not. For example, if the Data table has a field Expenditure and you assign None, this field will not be displayed and cannot be accessed by the user role. If you assign View this field will be displayed and the user role can view the information.
The Form Submissions are associated with None / Edit permissions. This means that you can enable the fields either for viewing or editing. For example, if the Data table has a field Expiry Date and you assign None, this field will not be displayed and cannot be accessed by the user role. If you assign Edit. this field will be displayed and the user role can modify the Expiry Date information.The details of the Use Case will be displayed in the pane. Specify the required information and click Save Changes to view the Permission Added confirmation box.
Edit or Delete Permissions
Follow the steps below to edit or delete permissions:
.png)
From the Roles tab, select the permission you want to edit.
Modify the associated information to edit or click the Trash icon if you want to delete the permission.
Assign Internal Admins to Track Submissions
To create an internal admin role that can track submissions, you will need to follow the below steps:
Starting on the Roles & Users tab, create a new role that is Enabled and assigned as an Internal Role Type.
.png)
Select the Internal Admin in the Roles table. Add permissions of all applicable use cases to the Internal Admin role.
.png)
Navigate to the Users tab. Assign the Internal Admin role to the specific users.
.png)
Lastly, assign the Internal Admin role to all external organizations you would like this role to be able to view submission history for.
.png)
Assign External Admins to Track Submissions
To create an external admin role that can track submissions made by users in their organization, you can select the check box Allow this role to view all data within their organization in the Add Role or Edit Role model.
.png)
Assign Permissions to Internal or External Admins for User Management
To allow an Internal or External Admin to add users on the Ushur hub, assign the permission by following the below steps:
Go to the Roles and Users tab.
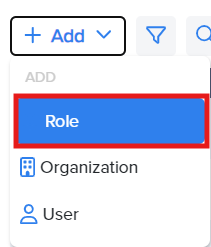
Click the + Add button and select the Role option.

View the list of roles in the summary table.
To add a new role, refer to the Add Roles section.
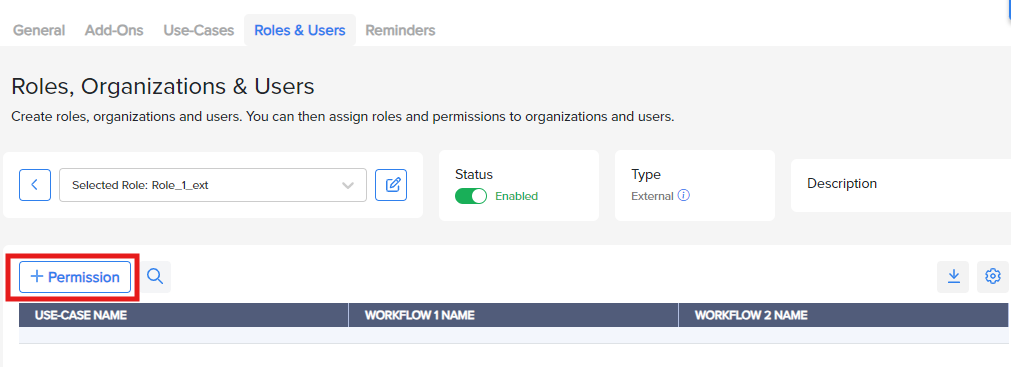
Or, select the applicable role from the summary table.
On the next page, select the + Permission option.

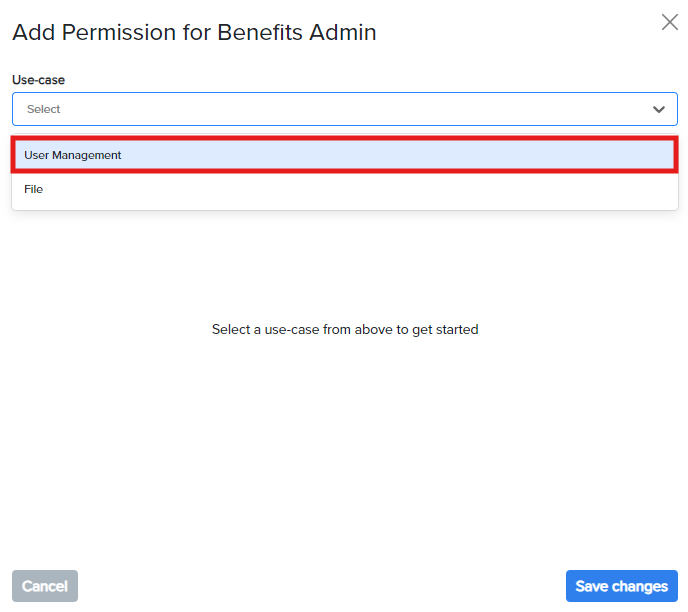
In the Add Permission modal:
Choose User Management from the Use-Case dropdown menu.

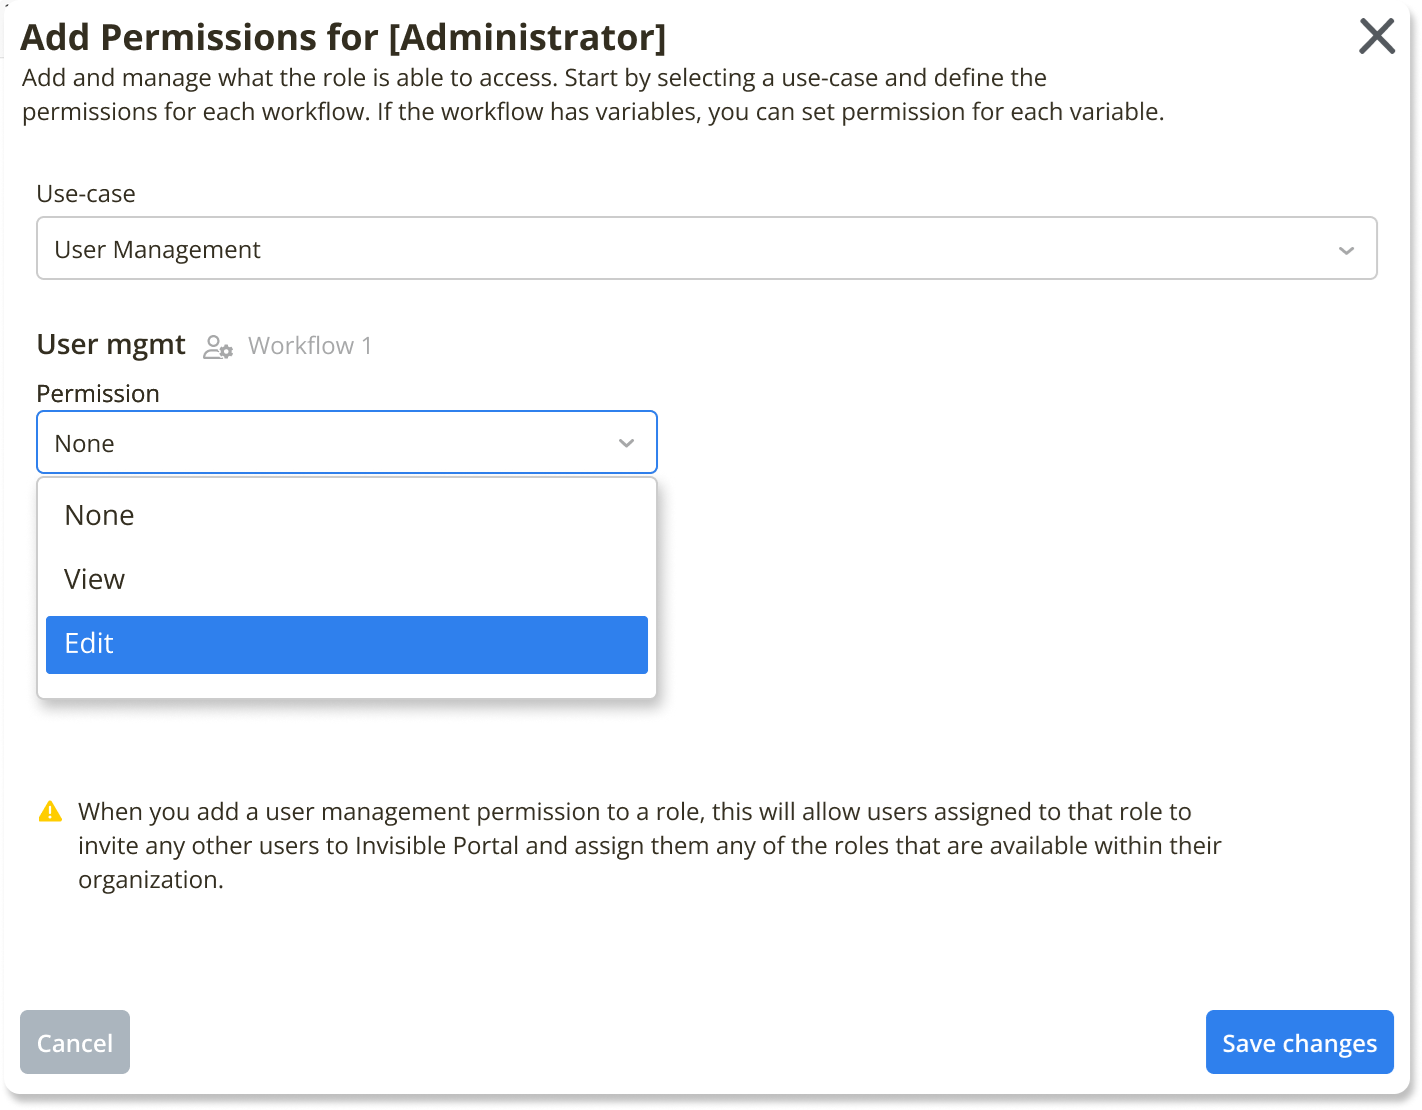
Select the appropriate Permission level from the dropdown menu:

None: The role cannot access this permission.
View: The role can view users but cannot add or edit them.
Edit: The role can perform all CRUD (Create, Read, Update, Delete) functions.
Note
Adding user management permission to a role allows users assigned to that role to invite other users to Ushur Hub and assign them roles available within their organization.
Click Save Changes.

.png)
.png)
.png)
.png)
.png)


