End User Display Pages
- 05 Sep 2024
- 12 Minutes to read
- Contributors

- Print
- DarkLight
- PDF
End User Display Pages
- Updated on 05 Sep 2024
- 12 Minutes to read
- Contributors
- Print
- DarkLight
- PDF
Article summary
Did you find this summary helpful?
Thank you for your feedback
This section provides information on how the user-facing pages will be displayed based on the settings specified in the General Tab of the Ushur Hub settings.
Login Page
The Invisible App Login page enables the following login options:
Login with MFA (Coming Soon!)
Log-in Scenario with IAM
Users must enter their email address, password, and, if enabled, a 6-digit security code sent to their email address. During an unsuccessful login attempt, users can request an alternate password using the Forgot password option or request help from email support.
.png "image(200).png")
Forgot Password
The user can opt for the Forgot Password option, during an unsuccessful login using an incorrect password. A prompt to enter a 6-digit security code sent to their email address is displayed. This will enable the user to reset the new password.
.png "image(202).png")
Reset Password
An active password expiry duration is 90 days. Users must create a new password to log in and must be different from all the 5 previous passwords created before. For more information, please refer to the IAM Password Policy. The Reset Password dialog box will display this information as shown below during a password reset process.
.png "image(203).png")
Home Page
The Home Page displays the organization information on the left pane and the Use Case configured as tiles on the right pane.
The Use Case tiles display can be viewed by the user, based on the role and permissions assigned. For example, if the user is assigned a Manager role with permission to view only 6 out of the 9 use cases, only these 6 cases will be visible to the user on the home page. For more information, refer to the Assign Roles and Permissions.
This is an example of what the Portal homepage would look like for an external organization’s user.
.png "image(204).png")
This is an example of what the Portal homepage would look like for your internal organization’s user.

This is an example of what the Portal homepage would look like for your organization’s user if their role is disabled or there are no use cases actively assigned to the role.

Notifications and Reminders
Admins can view and manage notifications directly within the Ushur Hub portal. Here’s how:

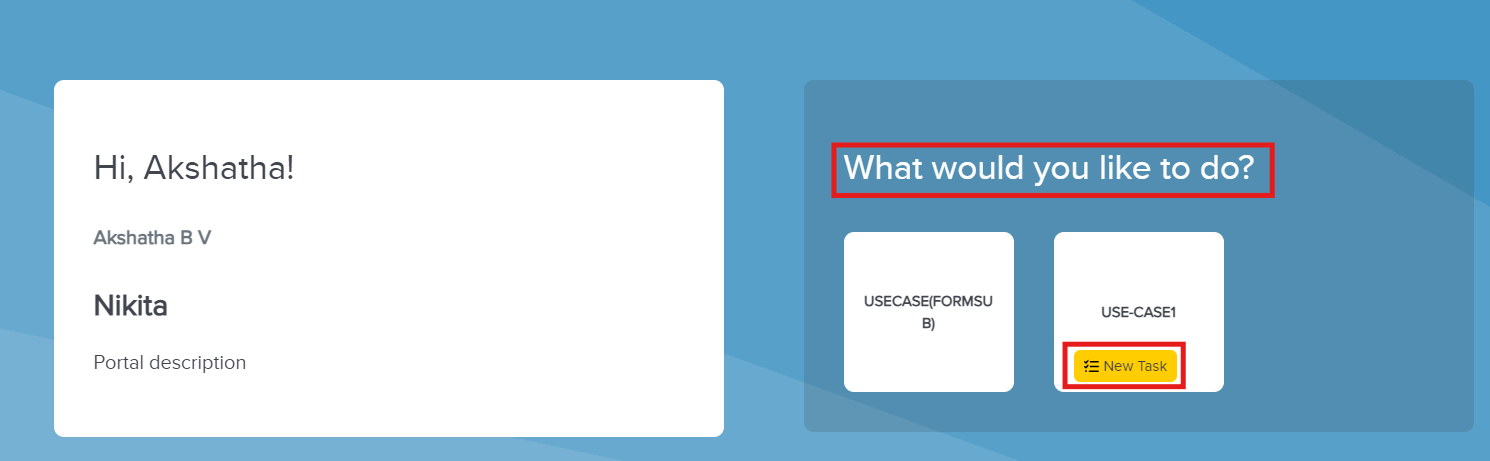
New Task Notifications:
Under the "What would you like to do?" section, newly assigned tasks are labeled as "New Task" for easy identification.
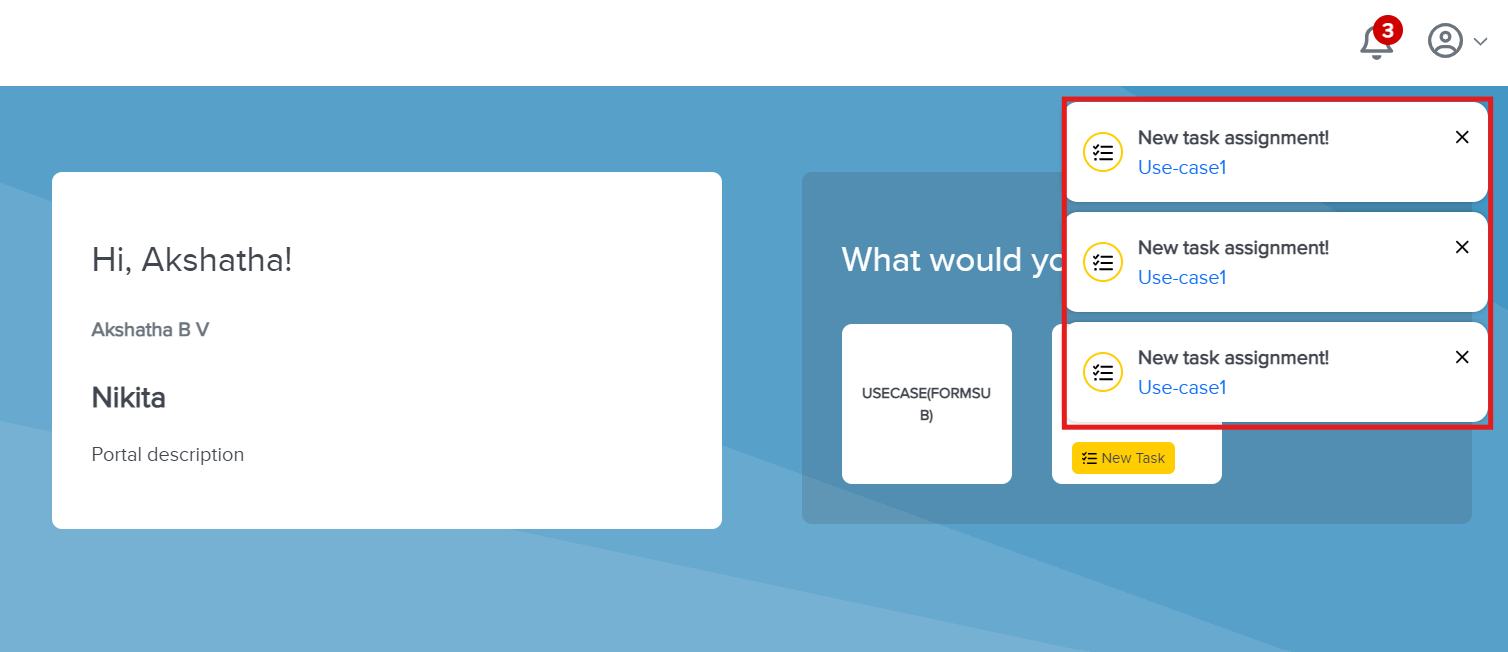
Notification Toaster:
When a new task is assigned while the admin is active on the portal, a Notification Toaster appears to alert them immediately.
Bell Icon for Notifications:
Located in the header section, the Bell Icon displays the number of unread notifications.

Viewing Notifications:
Access Notifications:
Click the Bell Icon to open the notifications panel.
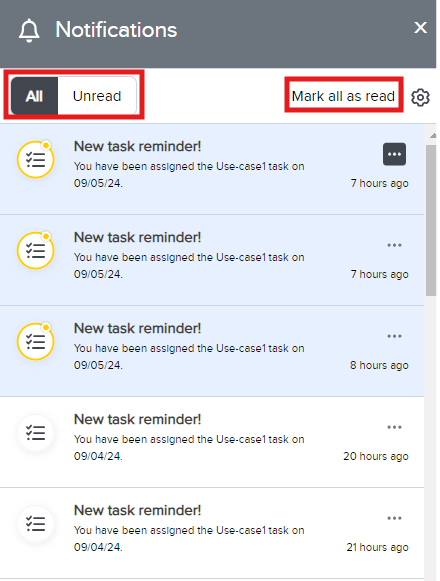
Notification Categories:
All: Displays both read and unread notifications.
Unread: Shows only unread notifications.
Mark All as Read:
Select the Mark all as read option to mark all notifications as read.
Managing Individual Notifications:
Mark as Read:
Click the More icon (usually represented by three dots) on a specific notification.
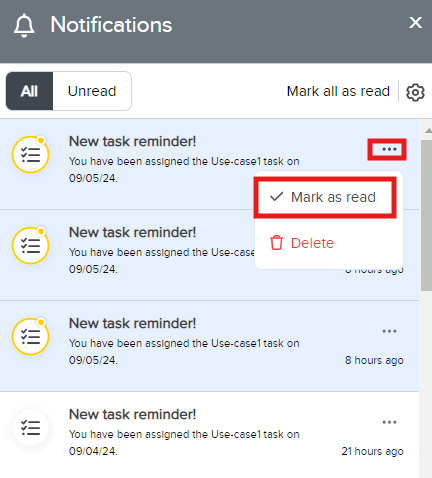
Select Mark as Read to mark that notification as read.
Delete Notification:
Click the More icon on a specific notification.
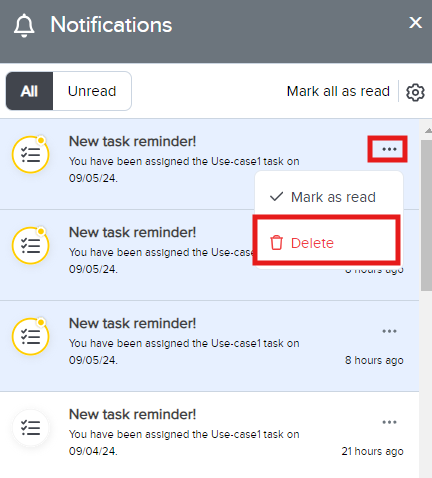
Select Delete to remove the notification from the list.


Note
Notifications remain accessible via the Bell Icon for 60 days before they are automatically removed.
Unsubscribing from Email Notifications:
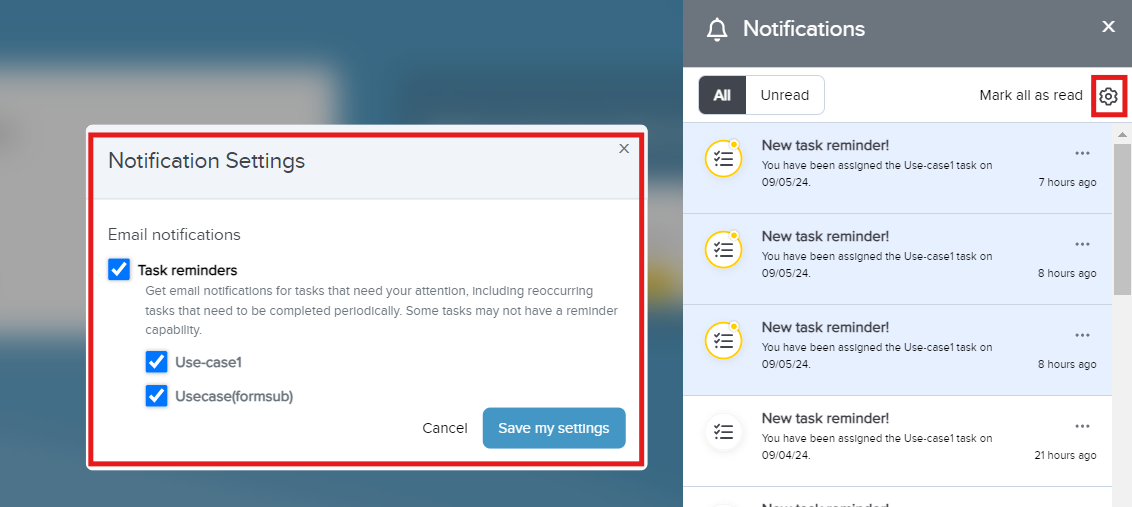
Access Notification Settings:
Click the Gear icon to open the Notification Settings dialog box.
Configure Email Preferences:
Task Reminders Checkbox:
Default: Selected to receive email notifications for tasks requiring attention, including recurring tasks.
To Unsubscribe: Uncheck the Task Reminders checkbox to stop receiving email notifications for all task-related reminders.
Selective Unsubscription:
Admins can also choose to unsubscribe from specific use-case notifications by unchecking the corresponding boxes under Task Reminders.

Submission Page
The user will be directed to the Submission Page when a Use Case tile is selected. This will enable them to view and engage with the form submission or data table workflows. The workflows and column data displayed to the user are based on the role and permissions granted to that user. For example, each column of data in the data tables can be configured to be made visible for a specific role. Similarly, specific workflow can be configured to be made visible in the form submissions for a specific role. For more information, refer to the Assign Roles and Permissions.
You can also configure to enable a single workflow for the form submission or two workflows for the form submission and data table.
Note
Submission history: If a user is assigned as an external role, they will only be able to view their previous submissions.
Single Workflow Enabled - Form Submission only
If a single form submission workflow is enabled for the selected use case, then the screen will display this single Workflow in the center.
.png "image(205).png")
Two Workflows Enabled - Form Submission & Data Table
If both workflows are enabled for the selected use case, then the screen will display both Workflow 1 and Workflow 2 as shown in the screen below.
.png "image(206).png")
Data Table Only
If one data table workflow is enabled for the selected use case, then the screen will display Workflow 1 in the center.
.png "image(207).png")
Data Table Functionality
Organization Filter
If the user has an Internal Role, then they will be able to see an organization filter at the top of their table to help them narrow down the data by one organization at a time.
.png "image(208).png")
Note
If the user has an Internal role, they will be able to see all submissions. If the user has an External role, they will only be able to see their submissions.
Filter and Refresh

On the Data Table Page, the User can do the following actions:
Filter and Sort
Filter
Click on the Filter
 Icon.
Icon.
Select the column to filter.
After selecting the column, Enter the specific text to filter.

Click Apply.
Sort
To sort the columns in the data table, click on the column header (e.g., PATIENT DOB) to toggle between ascending and descending order.


Notes:
To ensure efficient sorting, citizen developers should assign the correct data type to variables. For instance, if your workflow includes a date field and you want it to be sortable in the Data Table, set the Ushur variable's data type to Date or Timestamp.
Using the Text data type for dates can lead to sorting based on ASCII values rather than actual date values, which might not give the desired sorting order.
Refresh
Click the Refresh
 icon to update the table.
Note
Clicking the refresh icon will reset and update the data table, clearing any applied sorting and filtering. The data table will remain on the current page instead of navigating back to the first page of results while resetting any sorting or filtering applied.
Data Validation Page
The data validation page provides users with a comprehensive interface to review and validate the accuracy of extracted information. With this feature, users can quickly identify any inaccuracies in the extracted keys and manually override incorrect data, ensuring data integrity and accuracy within the system.
The Data Validation page displays a summary table with parameters based on the defined workflow.
User can filter and sort the table based on their requirement. Refer to Filter and Refresh.
Click the Open or Click button to view the Review and Update page.
Review and Update Page
Overview
On the Review and Update page, the user can view the extracted data that are received from the engagement. It is a Human-in-the-Loop feature that allows users to review and edit the extracted data. It also allows the user to add additional data that is relevant to the user before moving to the next stage.
Follow the below steps to navigate the data review page:
The review page has a two-column layout. The left panel displays extracted data with corresponding labels, and the right panel shows the source of the extracted data such as email and PDF attachments(native PDFs and scanned PDFs). The left panel displays three tabs:
Extracted Data tab: Select this tab to display the extracted data from the source which is email and the pdf attachments. Users can locate the data on the source just by clicking the appropriate field.

Data in Review tab: Select this tab to display the data marked with a low confidence badge, indicating the need for human review before proceeding.

All Data tab: Select this tab to view all extracted data and optional fields with predefined labels.


The below-mentioned three fields will now be displayed at the top of all the tabs by default:

First Name
Last Name
Date of Birth
These fields will be pinned to the top regardless of whether they contain values, ensuring consistent visibility and access for all documents.
Advanced Options
The Review and Update page has additional features that enable the user to search, filter, and review the data efficiently, those features are:
 Search Icon: Use the search icon to find specific values in the extracted data.
Color-coded flags: The color-coded flags marked on the data field are based on the below-mentioned conditions:
Flags
Keys


Low confidence Badge: The low confidence badge is used to indicate data in the Ushur system that has been predicted with low confidence and may not be accurate. The fields with low confidence badges should be reviewed and modified by humans if necessary to ensure accuracy.


How to review and correct the data using the Human-in-the-Loop feature?
On the Review and Update page, click the Data in Review tab on the left panel. The data fields available under this tab need to be reviewed and edited if necessary.
Click the data fields to locate the source of the data from the email or PDF that is displayed in the right panel.
Click the field to edit the value. The Value-Modified icon will be displayed.
To reset the field's value to its original extracted value, click the Reset Icon displayed on the right of the field.
Once you complete the changes, click the Submit Changes icon. The Submit Changes icon displays the total number of changes.

Or, if you want to reject the data, click the Reject Review button.

Or, If the data contains unrelated documents, click the Junk button.

To configure the Junk button:
Navigate to the Data Extraction Review module (legacy) in the applicable workflow.
Configure the third option Ignore to define the workflow for documents marked as Junk.
Documents marked as Junk in the Review and Update page are pushed to the workflow as configured in the Data Extraction Review module.
Ensure the Portal Settings > Use Cases Setting tab > Remove completed HITL columns checkbox is selected to hide records that are marked as Junk. Refer to Use-Cases Tab Settings.
Once the Junk button is clicked, the record disappears from the IP table, indicating workflow completion.
If you submit the changes before reviewing all data, a confirmation message will appear with the count of pending reviews. You can then click the Complete Review icon to finish or cancel.

If all the fields are addressed, click the Complete Review icon to proceed with the pending workflow execution.


Note
For instance, When making edits to data fields, ensure that the values are input in the format required by the final system processing the extracted data.
For instance, if you need to change a field value from "$7,500" to"$8,000", enter it as "8000" if the system accepts only numeric values without symbols or commas.
⚠️ It's important to adhere to these format requirements, as any deviation will not be automatically adjusted and may lead to data inconsistencies.
Record Locking and Duration Settings in HITL
In the Human-In-The-Loop (HITL) process, record locking ensures that multiple agents do not overwrite each other's work, maintaining data integrity. Additionally, a configurable lock duration is in place to automatically release records after a set period.
How It Works:
Immediate Locking:
When a citizen developer opens a record in HITL, it is immediately locked, preventing others from editing it.
Lock Duration:
The lock remains in place for the duration specified in the Enterprise Settings. The default lock duration is 60 minutes, with configurable options of 15, 30, 60, 120, or 240 minutes.
Note
This is an enterprise setting. To configure the Lock duration, contact your Customer Success Manager or SREs.
Automatic Lock Release:
If a record remains open beyond the set lock duration, the lock is automatically released. For example, if Citizen Developer A opens a record and does not close it within 60 minutes, the lock will be revoked, allowing another user (Citizen Developer B) to make changes.
Additionally, when a user decides to close the HITL window, they are prompted with a confirmation, and upon confirming, the system automatically releases the lock on the record, making it available for review by other agents.
Conflict Prevention:
If Citizen Developer B makes changes after the lock is revoked, Citizen Developer A will be unable to submit any changes they attempt to make afterward, receiving an error indicating that the record is under review by another user.

Preview Mode:
During the lock period, if another citizen developer (Citizen Developer B) attempts to open the same record, they will only be able to preview it. The Open button will be disabled, and only the Preview button will be active.


Download Files
Click the download button to save the selected file on your device. A successful file download checkmark will be displayed once it is saved on your device.
.png "image(209).png")
Pagination
By default, the latest 10 records will be displayed on the data table. If there are greater than 10 records, use the “Rows per page” dropdown to switch to displaying 15, 20, or 25 rows. Also, use the arrow buttons to view additional pages of submission records.
.png "image(210).png")
Footer
If configured on the General tab on the builder, Email Support, Privacy Policy, and Terms and Conditions links will be available for end users to navigate from each page on the Ushur Hub on the left side of the footer.
![]()
Copyright information including the year and the organization name will be displayed on the right side of the footer. To remove copyright information, uncheck the “Include copyright notice” checkbox in the General settings tab.
![]()
Enable Workflow-Based Success or Error Messaging
In the Message or Thank You module, you can set a Success or Error message based on the workflow. Select the Invisible App Properties section and choose the appropriate option for your module: None, Include a success checkmark, or Include an error X mark. The message to the user is configurable in the headings and label fields above (e.g. Message Body).
.png "image(211).png")
.png "image(212).png")
Here is an example of what the success or error messages look like on the workflow:
.png "image(213).png")
.png "image(214).png")
Automated Time Out
The Ushur Hub automatically times out after 5 minutes of inactivity. A 2-minute countdown timer is displayed, allowing the user to confirm their activity and continue the session. If the user does not respond, the Ushur Hub will securely sign the user out.
.png "image(215).png")
.png "image(216).png")
Was this article helpful?