- Print
- DarkLight
- PDF
Metadata is the data from the Enterprise that Ushur utilizes within the workflow. For example, it could be customer contact information such as email addresses, or phone numbers. It could be customer policy ID if the workflow deals with claims or appointment date/time/location if it is an appointment workflow.
The data is stored in a tabular form and can be accessed using the data table property corresponding to each column. These columns are referred to as data table properties.
To help you manage the properties and their associated data records, both functionalities are displayed on the Data Tables page and you can toggle between the two options.
.png)
Selected Project - Select any project (Ushur Studio and active Legacy projects) from the drop-down list to view the associated information summary. This pane also displays the total number of entries, the datatable properties, unique keys, and associated with the selected project.
Data - Slide to Data to view and add values to the properties that you just created.
Properties - Slide to Properties to view and edit the information of the related variables. This will be listed in the tabular pane below.
Add data - Use this option to Add Data table Property, Create records, Bulk upload records, or Upload History.
Download Data - Click to download data records.
Refresh - Click to display the latest records.
Filter - Use this option to filter and locate specific records in the Data Tables by applying parameters such as Request ID, Session ID, Phone, Email, Status, and others.
Settings - Click to modify the table view display.
Adding the Data Table Properties
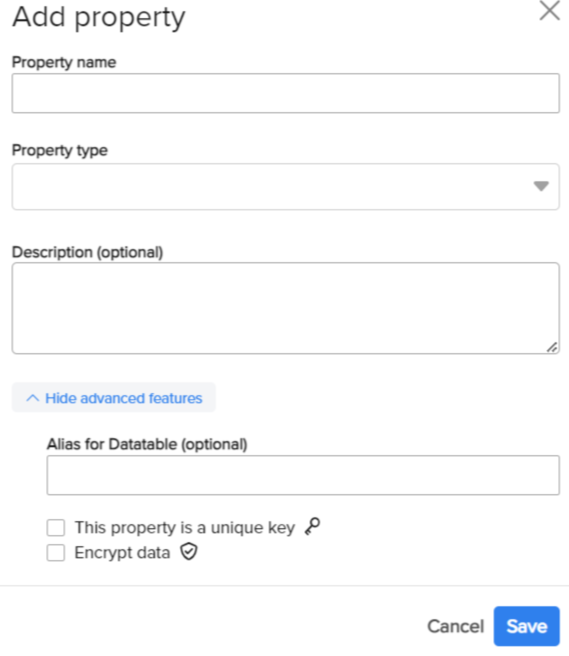
Click Data Tables, slide to the Properties tab > Add data > Add Property.
Enter the Property Name, Property Type, and Description, and click Save. Click Show Advanced Features to set the following configuration.

You can specify an Alias name for this property.
To assign it as the unique key by checking the This property is a unique key option.
You can also check to encrypt this data.
Click Save.
The Data Table property is now displayed in the grid. To modify or delete an existing Data Table Property, Select from the grid to display the Edit Property page as shown below. Modify the information or click delete. Once the Data Table Property is created, you can now create the Data records for the properties.
Adding the Data for the Property
To add the records for the property you just created, slide to the Data tab and click Add Data to display the dialog box. Specify the information for the property you created and click Save. You must ensure to create the mandatory fields.

The record will be displayed on the Data page as a grid. To modify or delete, slide to the Properties tab, and select from the grid to display the Edit Datatable Record page as shown below. You can modify the information or delete the selected record.
.png)

